

Hi there, our tutorial today is a text effect tutorial that shows you how to create a 3D text without using any new photoshop 3d functions so it's easy and possible to do with the older versions of photoshop, and this is the final result :

1-go to File>New then :
 2-select a light gray color (#e2e2e2) and use the Paint bucket to fill the document with that color :
 3-Now add a new layer:
 4-select the white color as foreground color:
 5-Select the brush tool :
 6-Right click and then select the 400px brush with 0 hardness :
 7-with one click in the middle try to get this:
 8-Press Ctrl+T and move it like this:

9- Now right click and then click Perspective :

and then
 10- Now select the Text tool (click T) and then apply these settings :
 11-after that type your desirable word or sentence :
 12-now go to :
 13-After that Duplicate the layer by pressing Ctrl+J and then select back the original layer :
 14-Press Ctrl+U or go to Image>adjustement>Hue/saturation and then :
 15-after that click on Ctrl+Up(arrow) and after that Ctrl+Right(arrow) to move the layer just a little bit:
 16-now Press Ctrl+J to duplicate the layer and click on Ctrl+Up(arrow) and after that Ctrl+Right(arrow) after that duplicate tha layer again and move it,and repeat this step 4 times like this :
now select all the layer that you made right now by holding Ctrl while selecting them and then Press Ctrl+E to Merge them in one layer
 17-Now repeat all of the 16the step again until you get this result :
 18-now add a next layer ( to add it go to Layer>New>Layer and then click OK ) and deplace it right in the place shown in the pic:
 19-now select the Brush tool (click B) then click Right in the document and chose these settings :

ads!
_______________________________________________________________
_______________________________________________________________
20-now use the brush and paint just a little in the bottom of the text to givethe shadow effect after tha go to Filter>Blur>Gaussian Blur and then :
 21-now now hold D and click on the icon of the layer shown in the text :
 22-make sure this is what you selected :
 23now add a new layer then drag in and place it right in place shown in the pic:
 24-Now select the brush tool with 30px radius and 0 hardness and then:
 25-repeat the previous step in the following places :
 26-now select these settings for the brush (45radius and 50% opacity ):
 27-now redo step 24 (using this brush of course ) to the next places :

 29-and then :
 30-Now chose the Erase tool (click E)
 31-and the use this brush :
 32-now click the first click and hold Shift and click in second place and try to erase this:
 33-redo the previous step to all the necessary places:
 34-now press Ctrl+D to deselect and then make sure that your shape is similar to this :
 35-after that change the opacity of this layer to 55% (or more or less depending on you wanted result ):


37-Now press Ctrl+T and then scale is like this :
 38-now :
 39-and then :

40-Now go to Filter>Blur>Gaussian Blur and then :

41-Now go to the 3D copy layer's Blending mode ( the front text layer ) by double clicking its icon:

42-Now select the Bevel and Emboss settings and follow the pic :

43and after that the gradient overlay settings:

44-now the last thing left is the coloring so make sure you're selecting this layer :
 45-press Ctrl+U and then chose your color (for me green is good )
 46-now select this layer:
 47-press Ctrl+U and set this numbers if you choose the green for the previous layer if not just select what matches:
 now we have to do an adittional thing to give more realism to the final result,
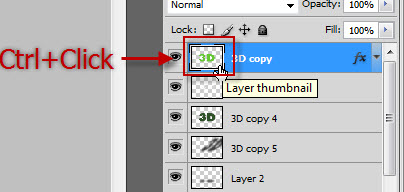
48-Hold Ctrl and click on the Front text's layer :
 49-select the gradient tool and chose this gradient(from black to transparent)
 50-now Hold Shift and drag like this:

and now after 50 steps !! this is our result:
thanks for reading and don't forget to comment and like our facebook fan page for the latest tutorials .
1-go to File>New then :


9- Now right click and then click Perspective :

and then


now select all the layer that you made right now by holding Ctrl while selecting them and then Press Ctrl+E to Merge them in one layer
ads!
_______________________________________________________________
_______________________________________________________________
20-now use the brush and paint just a little in the bottom of the text to givethe shadow effect after tha go to Filter>Blur>Gaussian Blur and then :


28-Go to:


36-now duplicate the 3D copy 5(or any other number ) layer by selecting it and pressing (Ctrl+J) after that select the original one and set its Opacity to 7%
37-Now press Ctrl+T and then scale is like this :

40-Now go to Filter>Blur>Gaussian Blur and then :
41-Now go to the 3D copy layer's Blending mode ( the front text layer ) by double clicking its icon:

42-Now select the Bevel and Emboss settings and follow the pic :
43and after that the gradient overlay settings:
44-now the last thing left is the coloring so make sure you're selecting this layer :


48-Hold Ctrl and click on the Front text's layer :


and now after 50 steps !! this is our result:
thanks for reading and don't forget to comment and like our facebook fan page for the latest tutorials .


3 comments:
good tutorial
haha
I rasterize the type but i can not select hue and saturation it doesnt appear
Post a Comment