How to make a wonderful shiny rainbow wallpaper( Desktop background ) using photoshop,
This time i will not make the introduction long cause most of you don't read it ;) so let us start this is our final result:
1-Open a 1027X768 new file .
2-Fill the back ground layer with black then Go to
Filter>Render>Lens Flare then:
3-Go to
Filter>Render>Lens Flare again then:
4-Go to
Filter>Render>Lens Flare again then follow the next pic:

The point is to add the flares until there is no black area in the wallpaper, so keep adding lens flares until you get a result like this but you may change as you like( the number and the place )
4-Add a new layer (
Layer>New>Layer) then go to
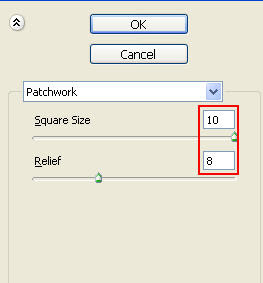
Filter>Render>Clouds after that Go to
Filter>Render>Difference Clouds after that go to
Filter>Texture>Patchwork then follow this pic:
5-Now go to
Filter>Blur>Smart Blur then :
6-Now go to Filter>Blur>Motion Blur then do just like this pic :
7-Now go to
Image>Adjustments>Hue/Saturation or just click Ctrl+U then check on Colorize ans set the hue to 284 but you can change that to any color (the hue refers to a color)you want (the red and purple are recommended ):
8-Now Set the blend mode of the last layer to Overlay :
9-Duplicate the previous layer the click
Ctrl+U then:
10-Add a new layer above them(in the top) by click on
Ctrl+Shift+alt+N in the same time then Select the Gradient tool:
11-Set the next setting :
12-then add a gradient like from top left to the bottom right like this :
13-Finally change the rainbow layer's blend mode to Overlay like this:
and this is the final result:

you can download the psd file of the tutorial
download the psd file
but with changing the lens flares in the back ground layer you may get a difference result like this


 The point is to add the flares until there is no black area in the wallpaper, so keep adding lens flares until you get a result like this but you may change as you like( the number and the place )
 4-Add a new layer (Layer>New>Layer) then go to Filter>Render>Clouds after that Go to Filter>Render>Difference Clouds after that go to


 you can download the psd file of the tutorial download the psd file


3 comments:
Great collection here
Love it!!!
Great Tut..
Post a Comment